I replaced the thin washers with something a little more sturdy. These "washers" were made from bits of an old flywheel I got for free from the bin outside a local workshop. Cutting them with an anglegrinder was fun, and left a big rusty patch outside my garage where the "sawdust" ended up.
There are three "safe" positions: opening to the right, opening down, and opening left. The washer goes on the crank in either direction, so what was opening down on one engine could be opening UP on another, depending on the whim of the engine builder. So the only really safe positions are opening left and opening right. These two positions are when the keyway slot is hoirzontal.
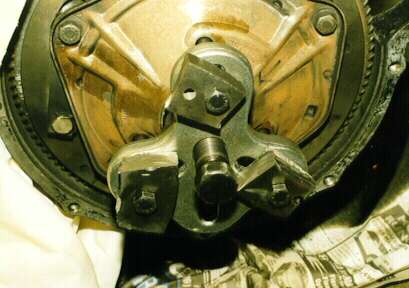
Before using the puller it is wise to make sure that the all threads are clean and well oiled, this is especially important for the main bolt in the middle of the puller. Also ensure you have something between the end of the puller bolt and the crankshaft. My puller has a "dolly" (as my neighbour the mechanic calls it) that fits the crank nose and spreads the load. Murrey Lockie (an engine reconditioner) uses a flywheel bolt with the back ground flat. This bolt is screwed into the crank leaving a couple of turns of gap for the flywheel to move. This technique sounds a little dodgy to me, but apparently causes no problems.
When the flywheel does let go, it may go with a bang, and the flywheel may fly across the room. I've never witnessed this, but I've heard of it. It is wise to attach the flywheel to the engine with wire or rope, so that when it does go, it doesn't land on your feet. Obviously don't tightly attach it as the whole point is to get it off! Murrey's flywheel bolt will do this job nicely as the flywheel only moves a few mm before hitting the bolt.
Attach the flywheel puller by screwing the three bolts all the way in. My bolts have about 1cm of thread on them, if your bolts have more thread then be sure not to tighten them all the way down and damage the clutch disc on the other side of the flywheel. Do not tighten the three bolts, they just have to be screwed all the way in. Now use a ruler and a straight edge to measure the distance between the flat face of the flywheel and the outer face of the puller. This distance should be the same at each corner of the puller. Adjust the three bolts to bring the puller parallel with the flywheel. This ensures the flywheel is pulled squarly and not tipped to one side. Do not unscrew the bolts more than a turn or maybe two turns. If you unscrew them too much you may strip the threads. You should have the big centre bolt done up finger tight during this operation to hold the puller against the bolts.
When the puller is square, tighten with a long extension bar. I use a 4 foot scafolding pole. You don't have to go overboard, get it as tight as you can comfortably do with a long extension bar and a helper to hold the engine steady (when it is out of the car).
Remeasure the distances. If they don't agree to within, say, half a millimetre, then LOOSEN the big bolt and adjust the small bolts and retighten and recheck. If you do not loosen the big bolt you will strip the threads on the small bolts.
When you have the puller dead square and VERY tight, whack the flwheel with a brass drift through the starter hole and off it should come. If it doesn't whack a few times more, and then retighten and recheck for sqareness and whack again.
I use a BIG brass drift and a 4lb hammer and hitting it a few times rather hard is enough to get it off. If you have a burly mate stopping the engine from falling over and a 4 foot lever, you should start to worry if it doesn't come off when it is so tight that between you, you can't stop the engine from falling over. If it doesn't come off by whacking it through the starter hole, then recheck the straightness and see if you can get it tighter...
I have never successfully used heat on a flywheel. Oil is supposed to be a BAD thing, as if it gets into the taper (which is unlikely) it can hold it on by surface tension. I'm not sure if it would make that much difference but it does seem like it would at best do nothing and at worst be slightly counterproductive.
A lot of people recomend drilling and tapping the three puller holes to 7/16" or even 1/2" UNF. This allows thicker bolts, which stretch less, and people say this is a good thing. I've never used one, and have so far had no trouble with the 3/8 bolts. If you do damage a thread in the flywheel, then you can probably drill and tap one size bigger in situ. If you do this, I would do all three, as the thinner bolts will stretch more, and tip the puller. Once the flywheel is off, tap the holes all the way through. Do not tap too deep while the clutch plate is still in the way. If you undo the spring housing to pressure plate bolts it may be possible to push the plate far enough away to tap most of the way through without damaging it, but I've never tried, and hope I never need to....
One day I might add pictures of the tools I use, and how to measure the squareness of the pull. Don't hold your breath though.